Tungsten Rivet Reaction Blocks
A rivet is a permanent mechanical fastener. Before it is installed it consists of a smooth cylindrical shaft with a head on one end. The end opposite the head is called the buck-tail. On installation the rivet is placed in a punched or pre-drilled hole. Then the tail is "upset" (i.e. deformed) so that it expands to about 1.5 times the original shaft diameter and holds the rivet in place. To distinguish between the two ends of the rivet, the original head is called the factory head and the deformed end is called the shop head or buck-tail. Tungsten rivet reaction blocks are widely used in rivet gun.
Because there is effectively a head on each end of an installed tungsten rivet reaction blocks it can support tension loads (loads parallel to the axis of the shaft); however, it is much more capable of supporting shear loads (loads perpendicular to the axis of the shaft). Bolts and screws are better suited for tension applications.
Fastenings used in traditional wooden boat building like copper nails and clinch bolts work on the principle of the rivet but tungsten rivet reaction blocks were in use long before the term rivet was invented and, where they are remembered, are usually classified among the nails and bolts respectively.
Preparation:
Materials deburred on edges;
Holes laid out in correct locations, taking into account pitch and edge distance requirements
Holes centre-punched using a backing plate to avoid sheet distortion;
Parts assembled securely together and supported while being drilled with a sharpened bit of the correct size. Holes drilled squarely to
surrounding surface.
Parts disassembled and holes deburred;
Holes dimpled or countersunk if accepting AN 426 Flush head rivets.
Parts reassembled and clecoed;
Selection of new AN rivets of correct diameter and length;
Assembly well secured in a vice, a jig or on a workboard.
Tips:
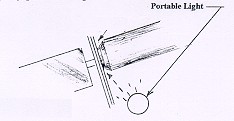
Before beginning a new phase, try rigging a test piece or a component mock up. Cardboard mock ups will conserve material and will help to obtain correct sizes and shapes.
Setting the first rivets of the day should be done on a test piece to ensure proper air pressure; tool adjustment; and operator currency.
Place masking tape on rivet sets to stabilise them while riveting. (renew frequently)
A rubber grommet placed over the rivet tail will compress components together ensuring a close joint as riveting progresses. Use where clamps or clecoes are impractical.
Rivet Gun
Rivet gun should be lightly oiled (air port and inner shank of set) daily before work commences. Set should be securely attached with retaining spring in place. It should then be tested on a firmly secured piece of wood. This will confirm its operational status and will alert the operator to any alterations necessary (change in air pressure; wrong size set, etc).
A rivet gun should not be fired:
without a set secured by a retaining spring
without an intended target firmly in place against set and without ear and eye protection
A rivet gun should be disconnected from the air source when:
Sets are being changed
Maintenance is being carried out on gun
Gun is not being used
Gun set
Rivet gun set is correct for the size of the rivet and is positioned at 90 degrees to the work surface. With universal rivet sets, the reflection of the gun set in an aluminium surface will give the impression of a continuous straight line with the gun set itself if positioned at 90 degrees. Also, light reflecting from the edge of the rivet head will appear as an even line around a properly positioned gun set.
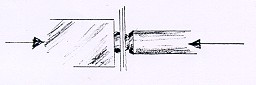
Bucking bar orientation
1. Rest bucking bar on inserted rivet and try to locate its point of balance.
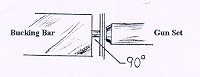
2. With gun set in place, use bucking bar to push rivet (and gun assembly) outward. Bucking bar will then register at right angles to the rivet as it comes to rest on the aluminium.
3. Push rivet back into place with gun set and reposition bucking bar, if necessary, to maintain its point of balance on the rivet. (repeat steps 2 and 3 until point of balance is determined). Often the index finger can be placed on the back of the bucking bar directly opposite the rivet tail. It then becomes the 'sensor' for correct bar position.
4. Pressure is held on gun while riveting. Bucking bar is held with only moderate force (otherwise rivet may be set with head proud of surface). A rubber grommet may be used over the rivet tail to assist in squeezing parts together during riveting. It acts as a 'pressure plate'
5. Duration of riveting is determined by experimentation with a test piece or previous experience.
Bench Riveting
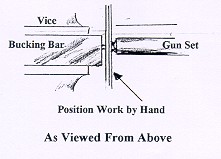
Often tungsten rivet reaction blocks are more easily riveted as sub-assemblies (off the airframe). A workbench allows components to be positioned and secured optimally for joining.
The bucking bar may be secured in a bench vice and, with the components positioned by hand, rivets are set with a gun held in the other hand. The main advantage here is that the bar is stationary and the components may be more easily held and positioned for riveting.
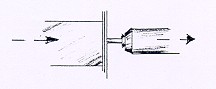
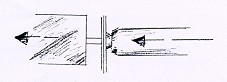
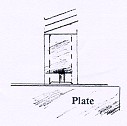
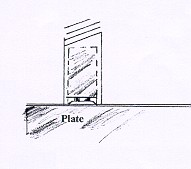
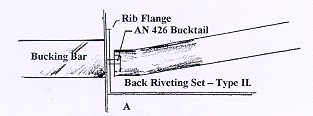
Back Riveting
Back riveting is a method of setting rivets, usually in a skin component, by striking the buck tails with a special gun set while the flush head is securely supported in its dimple or counter sink by a steel plate or bucking bar.
Control surfaces are usually back riveted using a horizontal steel plate mounted on a table. The skin rivets are held vertically in their holes with thin Scotch Magic tape or fine Mylar tapes over the heads. The internal rib or stiffener is placed over the rivets and the special gun set is used to sequentially set these fasteners. Note: try using all RV-Workshop Learning centre back riveting sets.
Type I
Type II
Type III

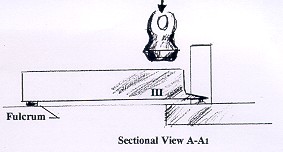
If the builder is working alone, sometimes it is difficult to judge when the backriveting set/gun is square to the surface being joined.
Solution:
Using shims, level the back riveting plate on the table.
Using a drill press, drill a half inch hole almost through a 4" x 4" x 2" piece of hardwood.
Mount a straight universal head rivet set in riveting gun.
Use Vaseline to push the end of the set into the hole in the hardwood.
Place the hardwood on the levelled surface plate so that the gun is supported vertically.
Secure a round bubble level vial to the butt of the rivet gun with RTV or a silicone adhesive.
Make sure the vial is positioned so that the bubble is in the centre.
Secure the assembly so that it cures in that position overnight.
This will aid in setting perfectly aligned rivets provided
The back riveting plate is levelled prior to use;
The gun is held with the bubble in the centre while riveting.
It pays to periodically recheck calibration using the wood block and straight rivet set. The straight set is only used during calibration. The back riveting set is reinstalled for actual riveting.
Tungsten alloy is a suitable material for tungsten rivet reaction blocks. So if you got any enquiry or question about tungsten rivet reaction blocks, please do not hesitate to contact us at [email protected], [email protected]. Tungsten rivet reaction blocks price will be offered based on size, density, quantity, hardness, and any other specific requirements.


